
Methods of Work: Mortise and Tenon Joints
This may sound like an admission that is not surprising to anyone but here it goes anyhow. I love cutting and making joinery. So far, at this point in my woodworking career, it is infinitely fascinating to me, I guess I don't ever expect that to change. If I catch myself saying, "oh god, here we go again, another dovetail . . . whoopie do" then I think I'll be hanging up my marking gauge.
Mortise and Tenon joints are basic, stock joints. Easy to get in concept, simple to make and design into a project, basic meat and potatoes woodworking, but at the same time this simplicity can make them oddly difficult to execute perfectly. The simplicity easily reveals mistakes to the trained eye, or worse yet, in the eye of the creator. You want them to be tight, but not a wedge. You like them to be square and lined up correctly but gaps at the shoulders of the joint stand out like sore thumbs. They need to be strong, but to make them as strong as possible you need to find a balance between the two chunks 'o' tree getting pinned together.
I am not a master woodworker, and I do not get these joints perfect every time, but I am getting to a point where I feel pretty comfortable in my abilities and the methods of work I have adopted to get them accomplished in a pretty simple way that yields good results.
I have my way of doing them, I have never been formally taught to do anything in woodworking, and so like other things I found my way into how to do them on my own. But I was thinking about them the other night, and thinking that I don't see anyone else on the web do them quite like I do. I assumed there had to be others around who were like me and that the cutting of this joint would be under some controversy similar to the perpetual dovetail pins or tails first debate.So I jumped onto the forum at Lumberjocks.com and asked the question, "Mortise first or tenon first?"
I wasn't sure what response I would get, that's half the fun of a forum question, but I did not expect every one who bothered to answer (and 317 views at the time that I write this) to basically agree that the cut their mortises first. I did not expect to be a lonely man trapped on the desert island that means I cut my tenons first. Until this I didn't even realize I was so lonesome...(your sympathy is appreciated :) )
I work very hard to be a simple man, and I like to keep my operations and shop simple as well, maybe this comes from the fact that I am self taught. I like multi-task basic machines when I use them. There is a possibility that someday I will own a dedicated mortising machine or a horizontal router set up, or one of the million ways I've seen mortises made in the magazines and on TV. but for right now, for my money, you can keep all of those things. All I need to make a mortise and tenon joint is a drill press with a forstner bit, a back saw, a few chisels, a mallet, a marking gauge and a pencil. I do often use a Stanley #71 router plane as well to flatten the sides of the tenon flat to the board face. This is how I do it.

First, now you may want to be sitting down, I cut my tenons . . . has everyone taken a deep breath and recovered. OK, Then lets move on. I scribe out the depth of the tenon on four sides of the board with a marking gauge, then I readjust the gauge to mark the thickness of the tenon, I usually make the thickness half that of the board, so a 3/4 inch board would have a 3/8 inch thick tenon.
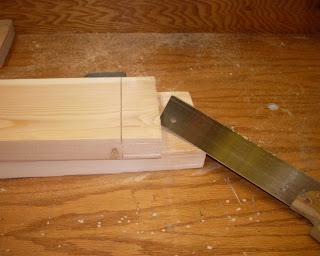 Then I take a backsaw and cut the shoulder down to my scribed lines.Then I secure the board against a plane stop and I use a chisel to chip out the would be waste. I like to start by getting the biggest chunks possible and sneaking up on the thickness line I've scribed. So I set the chisel to take half the material, and rap it with the mallet until I meet with my saw line, I work my way across the end grain, then I return to the start and set the chisel to take half of what's remaining. until I sneak up on the scribed line. I like to use as wide of a chisel as possible to do this and I work to keep it level and I do not let it cut down into the meat of the tenon if I can help it, but I don't find disasters in small irregularities. This work will be hidden inside the mortise eventually. I don't try to make things perfectly flat and square with the chisel
Then with the 1/2 inch blade set on my router plane to the appropriate finishing depth and I set it with one knob over the face of the board and the other kind of hanging out in space with the blade ready to cut in and level out the face of the tenon. I use one hand to hold the section on the face tight and flat down to the face and I pivot on that by swinging the end hanging in space. I just work my way across the tenon, flattening as I go. If I run into a area that is seriously higher or I have built up quite of bit infront of the blade, I will go back to a 1 inch chisel and make a few paring cuts so the router plane blade doesn't have to work so hard. This process finishes off both sides. If I had a tenon to make that was off center, then I would just have to make the necessary adjustments with marking gauge and router plane.

Now I use a marking gauge to judge where I want the indent of the tenon from the narrow faces of the board. I undercut with a backsaw using the established shoulders as a guide, Then I chip out the remaining with a chisel, again taking half, then half of what's left, then half again, and finally paring away to the line.


Now I have my tenons, I can use then to help me set exactly where I want my mortises to be.
I lay out the wood to be mortised and lay the tenon across it
 And I mark the position for the tenon. I also mark the boards with a pencil mark, so I know which sides are the outward face, and eventually which mortise belongs to which tenon.
 Then I hold the tenon flat along the face and scribe a pencil line to set the mortises offset from the face and back of the mortised board, This process is easier to follow in pictures than in to try to explain in words.


 Now I have the layout lines for my mortise. For shallow mortises I don't mind chopping them by hand but for deeper ones I still use the drill press and a forstner bit. I did but a set of mortising chisels that fit into the drill press a while ago and I have used them, but in all honesty I was not overly happy with the results and setting up the beast took a while to. I mush prefer to just be simple and chuck a forstner bit in and go. I don't even set the depth stop on the press, I make a mark on the bit with tape or sharpie and I stop by eye.
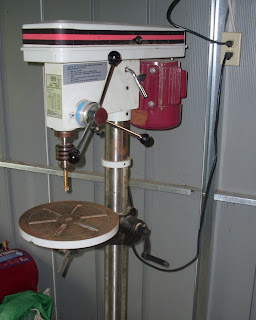
What I always do, whether I am using a chisel and making the socket by hand, or the drill press and forstner bit. I down size by one. That means to cut a mortise to accept a 3/4 inch thick tenon, I will use a 5/8ths chisel or forstner bit. The undersizing allows me two freedoms.
1. If my drilling is off by a tiny bit from the center line of the scribed lines of the mortise, it is no bit deal, the smaller bit still falls within the proscribed space. Less to worry about and I can be slightly human.
2. I can sneak up on a tight fit to the tenon by paring the sides of the mortise, and I have the room to do that even after removing the wavy ridges left by the press and bit.
 I always bottom out the mortise about a quarter inch deeper than the tenon is long. a little room for drawbore pins to pull things together and a space for some excess glue to collect without worry.
 When you're set, you test fit the whole thing. this method has never been a problem for me getting frames to turn out square. I do have a penchant for pegging my M&T joints with dowels, or drawbore pins for added strength above and beyond glue, but when its the right thing to do, just I have no worries with glue alone.
So, maybe I do make these joints wrong, maybe I'm misguided and a rebel, (cue the leather jacket, the Marlboro, and some dangerous music) But I find this method to be an easy way to lay out and create this joint simply and quickly without making a whole lot of fuss out of the process.
Let the stone throwing begin!
Cheers
Oldwolf
Mortise and Tenon joints are basic, stock joints. Easy to get in concept, simple to make and design into a project, basic meat and potatoes woodworking, but at the same time this simplicity can make them oddly difficult to execute perfectly. The simplicity easily reveals mistakes to the trained eye, or worse yet, in the eye of the creator. You want them to be tight, but not a wedge. You like them to be square and lined up correctly but gaps at the shoulders of the joint stand out like sore thumbs. They need to be strong, but to make them as strong as possible you need to find a balance between the two chunks 'o' tree getting pinned together.
I am not a master woodworker, and I do not get these joints perfect every time, but I am getting to a point where I feel pretty comfortable in my abilities and the methods of work I have adopted to get them accomplished in a pretty simple way that yields good results.
I have my way of doing them, I have never been formally taught to do anything in woodworking, and so like other things I found my way into how to do them on my own. But I was thinking about them the other night, and thinking that I don't see anyone else on the web do them quite like I do. I assumed there had to be others around who were like me and that the cutting of this joint would be under some controversy similar to the perpetual dovetail pins or tails first debate.So I jumped onto the forum at Lumberjocks.com and asked the question, "Mortise first or tenon first?"
I wasn't sure what response I would get, that's half the fun of a forum question, but I did not expect every one who bothered to answer (and 317 views at the time that I write this) to basically agree that the cut their mortises first. I did not expect to be a lonely man trapped on the desert island that means I cut my tenons first. Until this I didn't even realize I was so lonesome...(your sympathy is appreciated :) )
I work very hard to be a simple man, and I like to keep my operations and shop simple as well, maybe this comes from the fact that I am self taught. I like multi-task basic machines when I use them. There is a possibility that someday I will own a dedicated mortising machine or a horizontal router set up, or one of the million ways I've seen mortises made in the magazines and on TV. but for right now, for my money, you can keep all of those things. All I need to make a mortise and tenon joint is a drill press with a forstner bit, a back saw, a few chisels, a mallet, a marking gauge and a pencil. I do often use a Stanley #71 router plane as well to flatten the sides of the tenon flat to the board face. This is how I do it.

First, now you may want to be sitting down, I cut my tenons . . . has everyone taken a deep breath and recovered. OK, Then lets move on. I scribe out the depth of the tenon on four sides of the board with a marking gauge, then I readjust the gauge to mark the thickness of the tenon, I usually make the thickness half that of the board, so a 3/4 inch board would have a 3/8 inch thick tenon.

Then with the 1/2 inch blade set on my router plane to the appropriate finishing depth and I set it with one knob over the face of the board and the other kind of hanging out in space with the blade ready to cut in and level out the face of the tenon. I use one hand to hold the section on the face tight and flat down to the face and I pivot on that by swinging the end hanging in space. I just work my way across the tenon, flattening as I go. If I run into a area that is seriously higher or I have built up quite of bit infront of the blade, I will go back to a 1 inch chisel and make a few paring cuts so the router plane blade doesn't have to work so hard. This process finishes off both sides. If I had a tenon to make that was off center, then I would just have to make the necessary adjustments with marking gauge and router plane.

Now I use a marking gauge to judge where I want the indent of the tenon from the narrow faces of the board. I undercut with a backsaw using the established shoulders as a guide, Then I chip out the remaining with a chisel, again taking half, then half of what's left, then half again, and finally paring away to the line.


Now I have my tenons, I can use then to help me set exactly where I want my mortises to be.
I lay out the wood to be mortised and lay the tenon across it


What I always do, whether I am using a chisel and making the socket by hand, or the drill press and forstner bit. I down size by one. That means to cut a mortise to accept a 3/4 inch thick tenon, I will use a 5/8ths chisel or forstner bit. The undersizing allows me two freedoms.
1. If my drilling is off by a tiny bit from the center line of the scribed lines of the mortise, it is no bit deal, the smaller bit still falls within the proscribed space. Less to worry about and I can be slightly human.
2. I can sneak up on a tight fit to the tenon by paring the sides of the mortise, and I have the room to do that even after removing the wavy ridges left by the press and bit.


So, maybe I do make these joints wrong, maybe I'm misguided and a rebel, (cue the leather jacket, the Marlboro, and some dangerous music) But I find this method to be an easy way to lay out and create this joint simply and quickly without making a whole lot of fuss out of the process.
Let the stone throwing begin!
Cheers
Oldwolf


I'm in the total starting stages of this craft and I've made maybe 20 M&T joints. Your method is about where I've gotten to, though you've refined it in a couple areas that I'm going to steal from. Other big difference is I've been chopping out my waste with a chisel. Picked up a brace and bits recently and have been thinking about going the drill out waste route. I have also been experimenting witha tenon jig using a plane blade as described by Tage Fried in his book as I mostly saw my tenons to line on all edges and pare final adjustments with a chisel. Not sure that having a total moon backing your method is flattering but found it interesting you go about it the same way. I've had the same questions about my method as well, seems other people must do it different.
ReplyDeleteHey my friend, I'll take support anywhere I can get it so thank you. I have done the brace and bit method as well but when I made these mortises my bits were in poor shape. I recently bought some better and I'm hoping to break them in this weekend but we'll see.
ReplyDeleteThe funny thing is that I was unaware I was doing it "wrong" until I asked the question. I still feel that right is what works for me and gets me good results and you should always be sure to feel the same way. Especially if you are new to sawdust. Keep experimenting and don't let any fool tell you there is only one way to do a thing.
Thanks for reading
Oldwolf
Infidel! You *MUST* do the mortises first!!!
ReplyDeleteThe whole idea of which ones come first is as silly as the pins or tails. The only thing that matters is that they fit. I make the mortises first for one simple reason. It is easier for me to shim ill fitting tenons.......
:)
You should either make or otherwise acquire a mortise gauge though. Makes life easier and much finer lines than pencils for the layout.
I just spend last night chopping out all eight 1 1/4 X 3 through mortises on some 4x4s for my new bench. A pretty impressive pile of kindling once I finished.
Thanks David, dealing with some frustrating computer issues today and I really needed a laugh. It's been a while since I've been an infidel, think I may have to start trying harder to be difficult.
ReplyDeleteA mortise gauge would be cool, I often use a marking knife for my dovetails but I hadn't really been bothered much using the pencil on M&T's, Even when I strike a line with a knife or scribe point I find myself darkening it with a pencil half the time anyhow . . . first signs of old age? No comment.
The kindling pile can get impressive, I was planning to clean up a bunch of it in the shop this morning, but got sidetracked by the PC and it's issues. Using my wife's laptop right now and thinking that this might not be such a bad thing to switch up to. . .
anyway, enjoy the day!
Oldwolf
Well, I wouldn't say that you're all sick and alone for cutting the tenons first, but certainly it's far from common. I've seen variations on that router-plane method around, including a hand-made plane that has better registration on one side of the work.
ReplyDeleteI'd echo what David said about a mortise gauge, though. For M&T joints where the faces must align, using one is far more precise than a pencil.
It's especially important if you plan to start using a mortise chisel to chop mortises, because you need the precision and a setting for the width of your chisel. When you're doing it by hand, it's hard to beat a proper mortise chisel. They're fast and accurate; with just a little practice, you can knock out a mortise in a couple of minutes even if you're not Frank Klausz.
But there's always more than one way to do it.